Multi-Tenancy in Django
Have you ever wanted to build an application that canna serve more than one customer? And not just serving but also having each customer’s data isolated in their own separate databases?
In this article we will learn how to implement multi tenancy in django.
We have seen many organizations trying to move to the Software as a Service (SaaS) direction and with this you might find yourself wanting to serve different customers with the same application and mixing up their data in one database is not a good idea, so how can we combat this problem.
Before beginning this article I take it you have some basic understanding of both python and django.
Create a Django Application
For this article we try create a system that stores different books that a library has and you want this system to be used by different libraries.
Go to your preferred directory and create a new directory with any name of your choice, I’ll be using multiTenancyProject and navigate into the folder.
Create a virtual environment by running the command below:
1
virtualenv .venv
.venv is the name of the virtual environment You might get an error if you haven’t installed virtualenv. You can install virtualenv by running
pip install virtualenv
Activate the virtual environment and install the required libraries which in our case is django.
1
2
3
source .venv/Scripts/activate # for linux and macOS
.venv\Scripts\activate # for windows
pip install django
After the libraries have finished installing we can create our project by running:
1
django-admin startproject multitenant .
Then we can create our app named library
1
py manage.py startapp library
We now need to register our newly created app into the list of installed apps in settings.py
1
2
3
4
5
6
7
8
9
INSTALLED_APPS = [
    "django.contrib.admin",
    "django.contrib.auth",
    "django.contrib.contenttypes",
    "django.contrib.sessions",
    "django.contrib.messages",
    "django.contrib.staticfiles",
    "library"   #new
]
Add and register our models
After that is set we can go ahead and define the schema of our database. Inside the library folder, there is models.py file, add the following:
1
2
3
4
5
6
7
8
class Book(models.Model):
    title = models.CharField(max_length=100)
    author = models.CharField(max_length=100)
    publisher = models.CharField(max_length=100)
    publication_date = models.DateField()

    def __str__(self):
        return self.title
The above code specifies that we will have a Books table that will have title, author, publisher and publication_date fields. We now need to register the model in admin.py file so that we can be able to see it in django’s admin site.
Open admin.py file in the library folder and add the following
1
2
3
4
5
6
7
8
9
10
# admin.py

from django.contrib import admin
from .models import Book

class BookAdmin(admin.ModelAdmin):
    # This will display the fields in the admin interface
    list_display = ('title', 'author', 'publisher', 'publication_date')

admin.site.register(Book, BookAdmin)
Create a view
Inside views.py file in the library folder, we will add a function that fetches data form our database and returns them to be viewed by the user.
1
2
3
4
5
6
7
8
9
10
11
12
13
# views.py

from django.shortcuts import render
from .models import Book

def book_list(request):
    template_name = 'library/index.html'
    books = Book.objects.all()
    context = {
        'books': books
    }

    return render(request, template_name, context)
Configure the URLs
We now need o create a URL pattern that points to the view we created above. For this we need to create a new file called urls.py inside the library folder and add the following code:
1
2
3
4
5
6
7
8
# urls.py

from django.urls import path
from . import views

urlpatterns = [
    path('', views.book_list, name='index'),
]
After, we have to point the newly created urls.py file to the main urls.py file in the root project directory. Open the file and add the code below:
1
2
3
4
5
6
7
8
9
# urls.py - at project level

from django.contrib import admin
from django.urls import path, include # added include

urlpatterns = [
    path("admin/", admin.site.urls),
    path("", include("library.urls")) # new
]
Templates
Create a new directory and name it templates at the project level and inside it create another directory called library, then a file named index.html inside the library directory and add the following code:
1
2
3
4
5
6
7
8
9
10
11
12
13
14
15
16
17
18
19
20
21
22
23
24
25
26
27
28
29
30
31
32
33
34
35
36
37
38
39
40
41
42
43
44
45
46
47
48
49
50
<!-- index.html -->

<!DOCTYPE html>
<html lang="en">

<head>
    <meta charset="UTF-8">
    <meta name="viewport" content="width=device-width, initial-scale=1.0">
    <meta http-equiv="X-UA-Compatible" content="ie=edge">
    <meta name="Description" content="Enter your description here" />
    <link rel="stylesheet" href="https://cdnjs.cloudflare.com/ajax/libs/twitter-bootstrap/4.6.0/css/bootstrap.min.css">
    <link rel="stylesheet" href="https://cdnjs.cloudflare.com/ajax/libs/font-awesome/5.15.4/css/all.min.css">
    <link rel="stylesheet" href="assets/css/style.css">
    <title>Books List</title>
</head>

<body>
    <div class="container">
        <div class="row">
            <div class="col-md-12">
                <h1>Books List</h1>
            </div>
        </div>
        <div class="row">
            <div class="col-md-12">
                <table class="table table-striped">
                    <thead>
                        <tr>
                            <th scope="col">ID</th>
                            <th scope="col">Title</th>
                            <th scope="col">Author</th>
                            <th scope="col">Publisher</th>
                            <th scope="col">Actions</th>
                        </tr>
                    </thead>
                    <tbody>

                    </tbody>
                </table>
            </div>
        </div>
    </div>


    <script src="https://cdnjs.cloudflare.com/ajax/libs/jquery/3.5.1/jquery.slim.min.js"></script>
    <script src="https://cdnjs.cloudflare.com/ajax/libs/popper.js/1.16.1/umd/popper.min.js"></script>
    <script src="https://cdnjs.cloudflare.com/ajax/libs/twitter-bootstrap/4.6.0/js/bootstrap.min.js"></script>
</body>

</html>
We need to tell django where to get the templates folder from. open settings.py file and look for a section with TEMPLATES and make it look like below:
1
2
3
4
5
6
7
8
9
10
11
12
13
14
15
16
17
# settings.py

TEMPLATES = [
    {
        "BACKEND": "django.template.backends.django.DjangoTemplates",
        "DIRS": ['templates'], # added templates
        "APP_DIRS": True,
        "OPTIONS": {
            "context_processors": [
                "django.template.context_processors.debug",
                "django.template.context_processors.request",
                "django.contrib.auth.context_processors.auth",
                "django.contrib.messages.context_processors.messages",
            ],
        },
    },
]
Running the Project
By default django uses sqlite database, so will just run our migrations and create a superuser thereafter so that we can be able to log into django’s admin site.
To run our migrations we run the following commands:
1
2
py manage.py makemigrations
py manage.py migrate
Run the commands in that order. The first command makemigrations is used because we create a new model Book then the second command now commit the changes to our database.
To create a super user, we do that by running:
1
py manage.py createsuperuser
Populate the details that you will be prompted to enter and remember those details as we will use them to log into the admin site. Run the project now by using:
1
py manage.py runserver
If everything runs without any issue, then we are good to proceed, navigate to http://localhost:8000/admin and login with the details you had created to access the admin site. Add some books and navigate to the home page i.e http://localhost:8000/ to see if the books will be visible. You should see something like what is below:

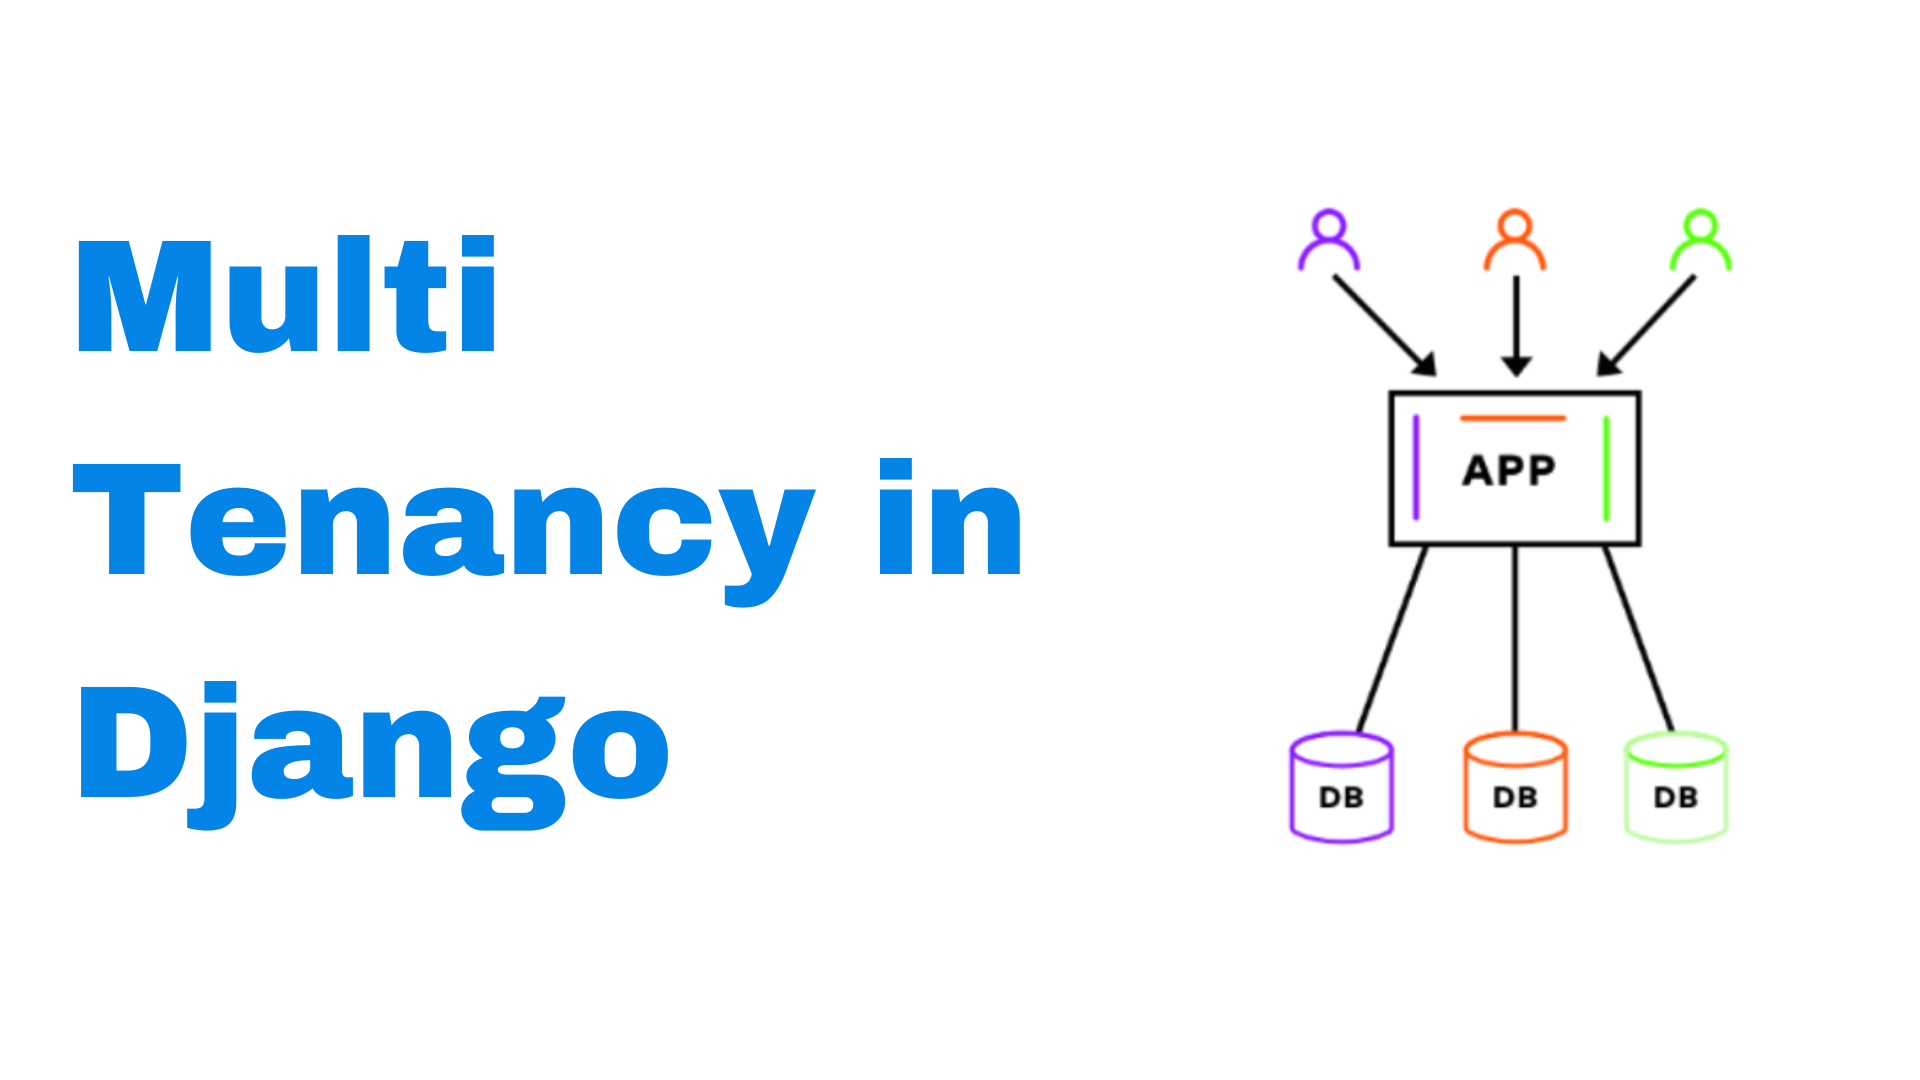
Implementing Multi-Tenancy
We need to structure our system to support multiple databases i.e each client will be assigned their own database.
Add Multiple databases
Based on the number of clients/tenants, we need to define each database for each one of them. Assuming the system is being used by three clients, namely Acumen, Maximus and Grand, we will add them in the databases dictionary in settings.py file as shown below:
1
2
3
4
5
6
7
8
9
10
11
12
13
14
15
16
17
18
19
20
# settings.py

DATABASES = {
    "default": {
        "ENGINE": "django.db.backends.sqlite3",
        "NAME": BASE_DIR / "db.sqlite3",
    },
    "acumen": {
        "ENGINE": "django.db.backends.sqlite3",
        "NAME": BASE_DIR / "acumen.sqlite3",
    }, # new
    "maximus": {
        "ENGINE": "django.db.backends.sqlite3",
        "NAME": BASE_DIR / "maximus.sqlite3",
    }, # new
    "grand": {
        "ENGINE": "django.db.backends.sqlite3",
        "NAME": BASE_DIR / "grand.sqlite3",
    }, # new
}
Determining which database to be accessed
Our app must be able to determine which database the tenant should read from when a request is delivered to the server and we can accomplish that with the aid of a few helper functions.
Inside our library folder, we will add a file called utils.py and add the following code:
1
2
3
4
5
6
7
8
9
10
11
12
13
14
15
16
17
18
# utils.py

from django.db import connection

def get_hostname(request):
    return request.get_host().split(':')[0].lower()

def get_tenants_map():
    return {
        "acumen.library.local": "acumen",
        "maximus.library.local": "maximus",
        "grand.library.local": "grand",
    }

def get_db_name(request):
    hostname = get_hostname(request)
    tenants_map = get_tenants_map()
    return tenants_map.get(hostname, "default")
From the above code:
- get_hostname() - this takes the request and removes the ports and returns a bare URL
- get_tenants_maps() - this returns a dictionary with the added tenant’s urls as keys and the database names as values.
- get_db_name() - this returns the name of the database that matches the request passed to it.
Middleware
Middleware is a framework that helps ypu plug into the request or response processing in django.
In the library folder, create a new file and name it middleware.py and add the following code:
1
2
3
4
5
6
7
8
9
10
11
12
13
14
15
16
17
18
19
20
21
22
23
24
# middleware.py

import threading
from django.db import connections
from .utils import get_db_name

ThreadLocal = threading.local()

class TenantMiddleware:
    def __init__(self, get_response):
        self.get_response = get_response

    def __call__(self, request):
        db = get_db_name(request)
        setattr(ThreadLocal, 'tenant', db)
        response = self.get_response(request)
        return response


def get_current_tenant():
    return getattr(ThreadLocal, 'tenant', 'default')

def set_current_tenant(db):
    setattr(ThreadLocal, 'tenant', db)
In the above code, using the callable object which gets the name of the database and passes it to the ThreadLocal variable.
We also have a function that gets the current database name from the ThreadLocal variable and another function to set the name from the database router.
Route the databases
Sung the data passed to the middleware we can be able to hook that into our database routing process which will create a central place where django can look up the database that the tenant request should call.
Create a new file named router.py in the library directory and add the following:
1
2
3
4
5
6
7
8
9
10
11
12
13
# router.py

from . middleware import get_current_tenant

class TenantRouter:
    def db_for_read(self, model, **hints):
        return get_current_tenant()

    def db_for_write(self, model, **hints):
        return get_current_tenant()

    def allow_relation(self,  *args, **kwargs):
        return True
From the above code, we have specified points to a database to read or write which returns the name of the current database and we have allowed relationships between two objects in our models.
Register Middleware and Router
In settings.py we will update the MIDDLEWARE list to look as what we have below and also add the DATABASE_ROUTERS list.
1
2
3
4
5
6
7
8
9
10
11
12
13
14
# settings.py

MIDDLEWARE = [
    "django.middleware.security.SecurityMiddleware",
    "django.contrib.sessions.middleware.SessionMiddleware",
    "django.middleware.common.CommonMiddleware",
    "django.middleware.csrf.CsrfViewMiddleware",
    "django.contrib.auth.middleware.AuthenticationMiddleware",
    "django.contrib.messages.middleware.MessageMiddleware",
    "django.middleware.clickjacking.XFrameOptionsMiddleware",
    "library.middleware.TenantMiddleware", # new
]

DATABASE_ROUTERS = ["library.router.TenantRouter"] # new
Configure Host Names
We need to map the hostname to our local machines and to do that we need to edit the hosts file which can be found in the path:
1
2
C:\Windows\System32\drivers\etc\    # For Windows
/etc/hosts                          # For Linux
Open the file with any text editor of your choice and add the following hosts:
1
2
3
4
5
6
# hosts

127.0.0.1 library.local
127.0.0.1 acumen.library.local
127.0.0.1 maximus.library.local
127.0.0.1 grand.library.local
Our ALLOWED_HOSTS in settings.py file also needs to be updated to be as follows:
1
ALLOWED_HOSTS = ['library.local', 'acumen.library.local', 'maximus.library.local', 'grand.library.local']
Making Migrations
We need to run migrations for all the databases we created and create superusers for each one of them. FOr this we need to a custom manage.py file to handle our case of having multiple databases.
Create a new file and name it library_manage.py at the project level directory and add the following code:
1
2
3
4
5
6
7
8
9
10
11
12
13
14
15
16
17
18
19
20
21
22
23
24
25
26
27
28
29
30
31
32
33
34
35
# library_manage.py

#!/usr/bin/env python
"""Django's command-line utility for administrative tasks."""
import os
import sys

from library.middleware import set_current_tenant


def main():
    """Run administrative tasks."""
    os.environ.setdefault("DJANGO_SETTINGS_MODULE", "multitenant.settings")
    try:
        from django.core.management import execute_from_command_line
    except ImportError as exc:
        raise ImportError(
            "Couldn't import Django. Are you sure it's installed and "
            "available on your PYTHONPATH environment variable? Did you "
            "forget to activate a virtual environment?"
        ) from exc
    execute_from_command_line(sys.argv)

    from django.db import connection

    args = sys.argv
    db = args[1]
    with connection.cursor() as cursor:
        set_current_tenant(db)
        del args[1]
        execute_from_command_line(args)


if __name__ == "__main__":
    main()
In the above code:
- args - this stores sys.args which is a list of command-line arguments that gets passed.
- db = args[1] - from the arguments passed, we get the value at position 1 in the array.
- with-connection.cursor() - opens the connection for the queries in it to be executed.
- set_current_tenant - uses the name we pass as arg[1] to route the database specified.
- del args[1] - deletes the database name argument after the routing has been done.
- execute_from_command_line(args) - executes the command that you type .
Running the Commands
After everything is set, we can now run the migrations and proceed with creating of superusers.
1
py manage.py makemigrations library
For Acumen
1
2
py manage.py migrate --database=acumen
py library_manage.py createsuperuser --database=acumen
For Maximus
1
2
py manage.py migrate --database=maximus
py library_manage.py createsuperuser --database=maximus
For Grand
1
2
py manage.py migrate --database=grand
py library_manage.py createsuperuser --database=grand
Testing
To run the local server and test we run:
1
py manage.py runserver library.local:8000
You can go ahead and the view the different multitenant sites by the following urls:
- Tenant Default :
- Main Site: http://library.local:8000/
- Admin Site: http://library.local:8000/admin/
- Tenant Acumen :
- Main Site: http://acumen.library.local:8000/
- Admin Site: http://acumen.library.local:8000/admin/
- Tenant Maximus :
- Main Site: http://maximus.library.local:8000/
- Admin Site: http://maximus.library.local:8000/admin/
- Tenant Grand :
- Main Site: http://grand.library.local:8000/
- Admin Site: http://grand.library.local:8000/admin/
You can log into the different admin sites and uploading different books and see the changes.
Incase you need the codebase, you can access it through this Github link.